nanoGPT is an excellent project for understanding how GPT works. It is a minimal reproduction of GPT-2, trained on OpenWebText. It is a great starting point for anyone who wants to learn how to train a GPT model.
Even though the steps outlined in the README are easy to follow, but setting everything up to get it working is not a trivial task, especially for someone who is not familiar with the cloud infrastructure and GPU drivers.
I have spent a few days to get it working on Azure with NVIDIA T4 GPU. I hope my tutorial can help you save some time and get you started with training your own GPT model.
Hardware
When it comes to training a proper GPT model, you need a proper GPU.
The creator of nanoGPT karpathy used 8 A100 40GB GPUs and it took about 4 days to get to a loss of ~2.85. One such GPU is currently selling at $6,250.00 USD on eBay now. To rent a VM instance with one single A100 GPU on Azure (Standard_NC24ads_A100_v4), it costs $2,681.29 USD a month.
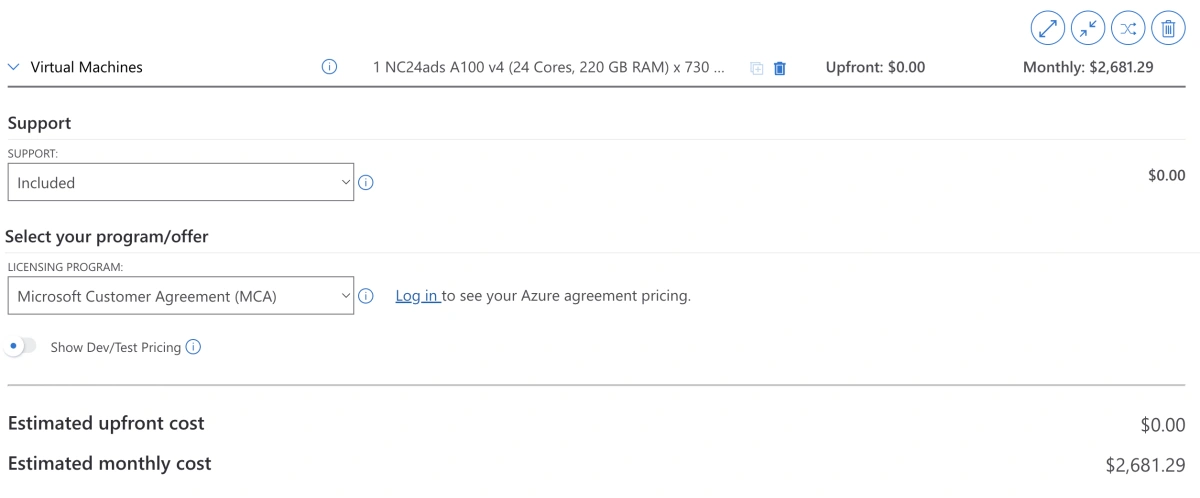
Standard_NC24ads_A100_v4 costs $2,681.29 USD a month on Azure
For cheaper alternatives, you can either use your own graphics card from a gaming PC or rent a less powerful GPU from cloud providers.
It is worth noting that Macbooks, specifically the Apple Silicon chips (M1, M2) are not powerful enough to train the nanoGPT model. In my testing, it took 6 hours to get 20 iterations on my M1 Macbook Pro. There are a total of 600,000 iterations by default. So it will take 180,000 hours (20.5 years) to complete the training.
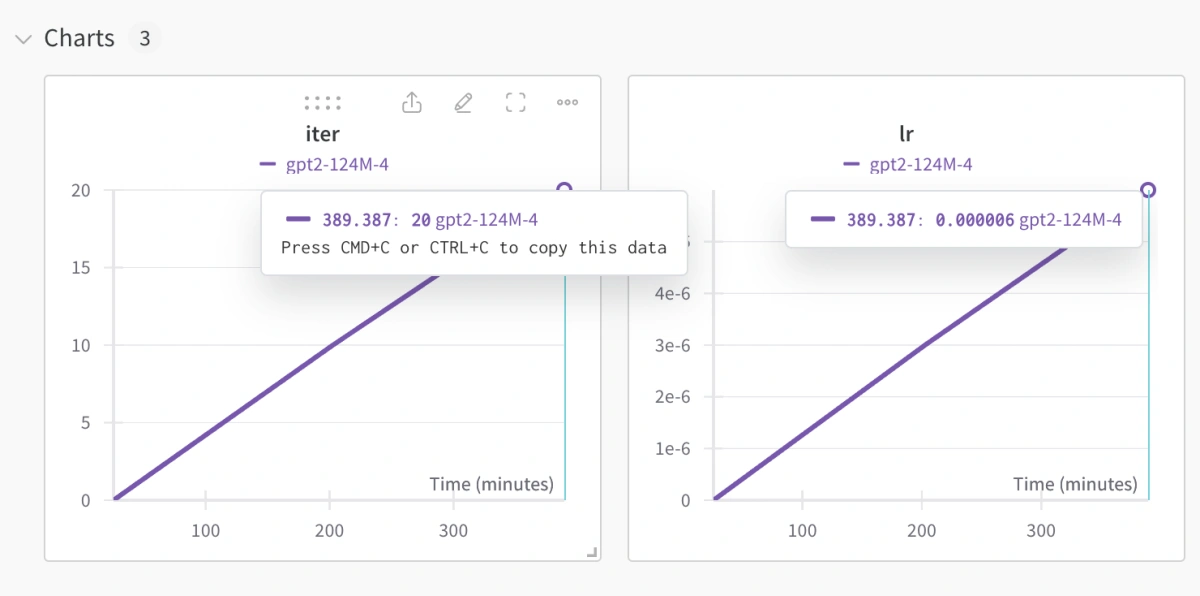
Weights & Biases chart for training nanoGPT on Macbook
For this guide, I will be renting a GPU instance Azure, specifically Standard NC4as T4 v3 (4 vCPUs, 28 GiB memory) with a single NVIDIA T4 GPU which was released in 2018.
If you happen to be running a startup, you can get some free Azure credits from Microsoft for Startups that can be used to run this experiment.
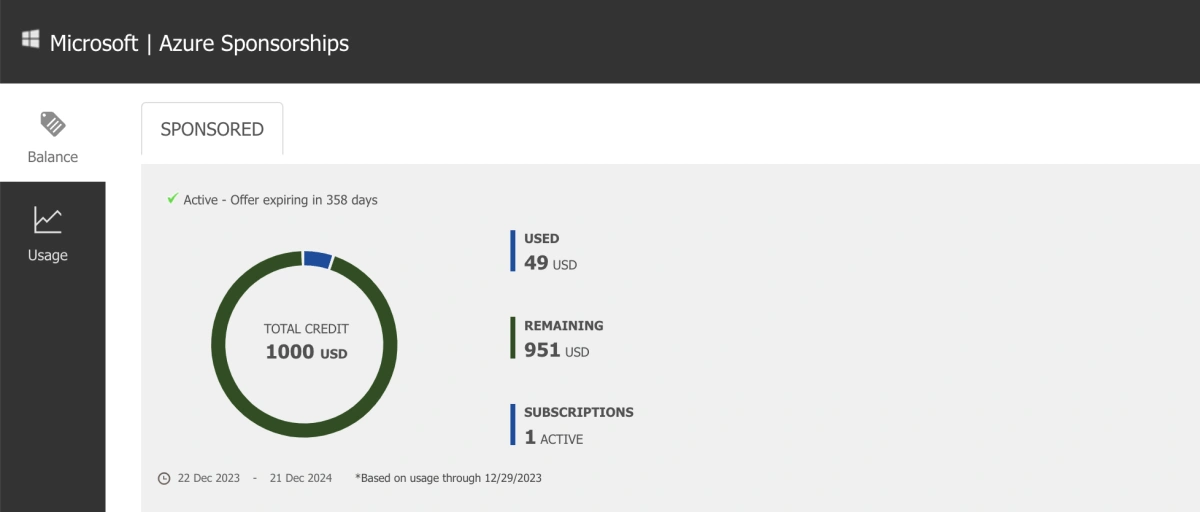
Microsoft for Startups offers free Azure credits
This instance type is not directly available on Azure as the default quota for this instance type is 0. You will need to request for a quota increase in the Quotas module in the Azure portal.
It is worth noting that the quota number refers to the number of vCPUs. For one instance of NC4as T4 v3, it has 4 vCPUs. So if you want to run 1 instance, you will need to request for a quota of 4.
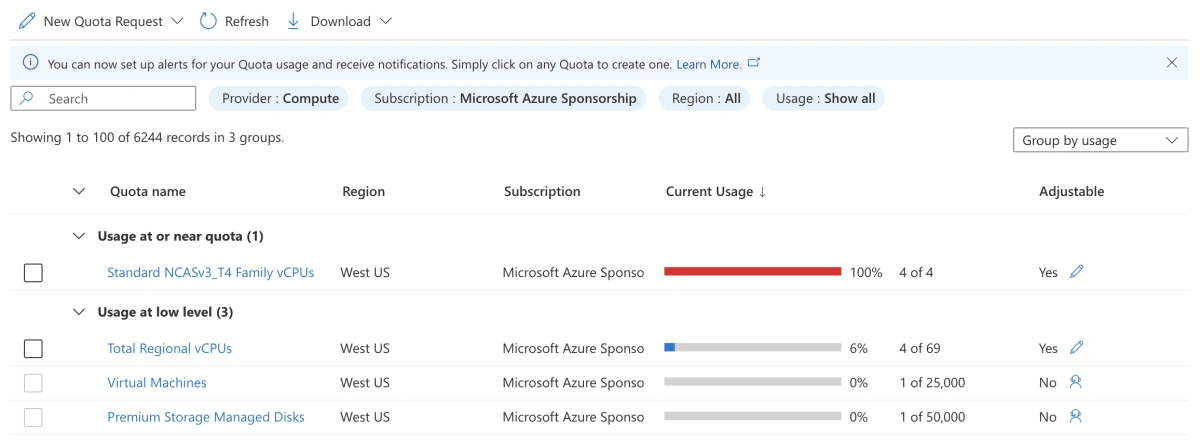
Azure Quotas module
The first time I tried to increase it, it was stuck in automated request and did not complete. Then the next day I tried again and it went into a support ticket. Once the support ticket was created, the process was quite smooth, it took me a few hours to get the quota increase approved.
VM and NVIDIA Driver Setup
Now with the quota increase approved, you can create a new VM instance with the NC4as T4 v3 instance type.
I went with Ubuntu 20.04 LTS as the OS. I chose 512GB for the disk size as the training data and checkpoints will take up a lot of space.
You can leave most of the settings as default. The two things you need to pay attention to is the Security type and Extensions:
For the Security type, I recommend selecting Standard. I had encountered some issues installing the NVIDIA driver manually with Trusted launch virtual machines, so in my second attempt, I went with Standard and it worked.
If anyone can confirm if NVIDIA GPU Driver Extension works with Trusted launch virtual machines, please let me know.
For the Extensions, You need to select the NVIDIA GPU Driver Extension, which will automatically install the NVIDIA driver for you including CUDA, which is required for training the model using the GPU.
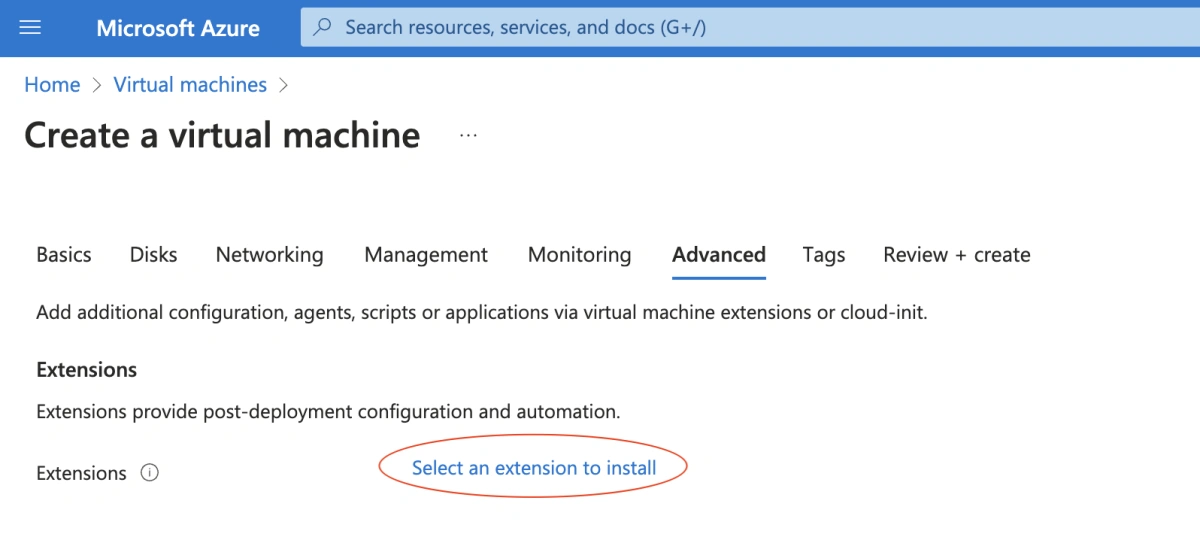
Azure VM extensions
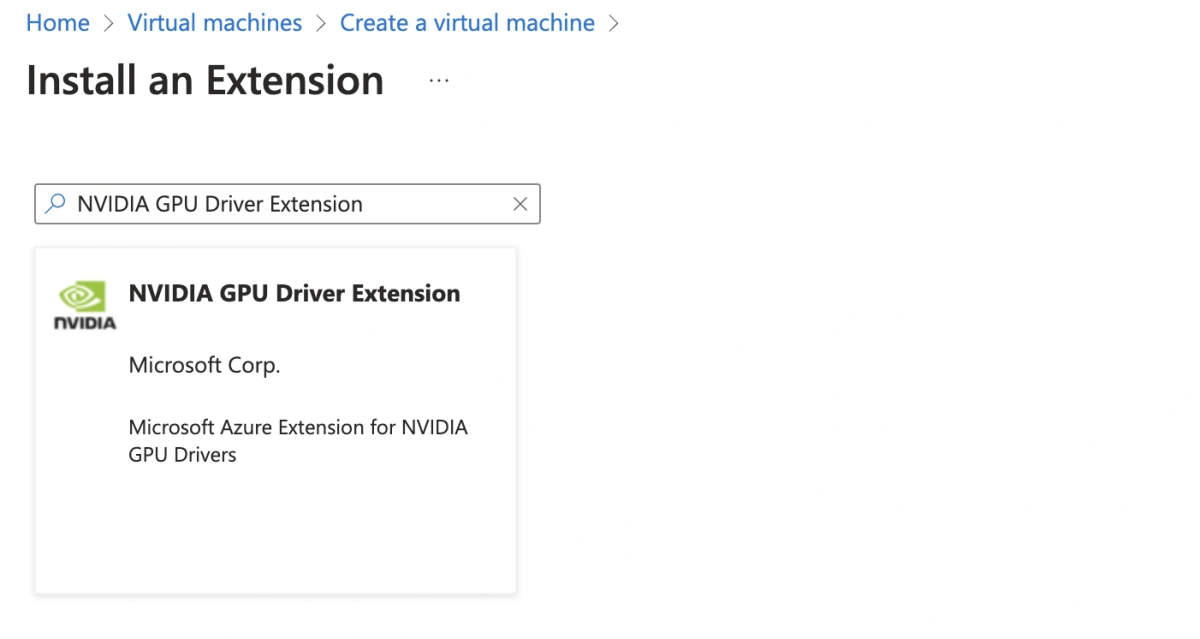
NVIDIA GPU Driver Extension
There is manual installation guide on NVIDIA’s website and manual installation guide on Azure’s website if you want to try it out. But I recommend using the extension as it is much easier.
Here you will also setup how you access the VM (Authentication type). I recommend using SSH with your existing public key. If you are not familiar with SSH, you can use the Password option.
Python Setup
Once you have the VM instance up and running, you can SSH into the VM and setup the Python environment.
The Azure VM comes with Python 3.8 pre-installed, but it is recommended to setup a separate Python environment for this project so that you do not mess up the system Python. Moreover, the Python that comes with the VM does not include pip, which makes it hard to install Python packages.
I recommend using pyenv to manage your Python versions:
First, install the required dependencies for building Python following the pyenv Wiki:
$ sudo apt update; sudo apt install build-essential libssl-dev zlib1g-dev \
$ libbz2-dev libreadline-dev libsqlite3-dev curl \
$ libncursesw5-dev xz-utils tk-dev libxml2-dev libxmlsec1-dev libffi-dev liblzma-dev
Next, use automatic installer to install pyenv:
$ curl https://pyenv.run | bash
Then, follow the guide to set up your shell environment for Pyenv:
Setup
~/.bashrc:
$ echo 'export PYENV_ROOT="$HOME/.pyenv"' >> ~/.bashrc
$ echo 'command -v pyenv >/dev/null || export PATH="$PYENV_ROOT/bin:$PATH"' >> ~/.bashrc
$ echo 'eval "$(pyenv init -)"' >> ~/.bashrc
Setup
~/.profile:
$ echo 'export PYENV_ROOT="$HOME/.pyenv"' >> ~/.profile
$ echo 'command -v pyenv >/dev/null || export PATH="$PYENV_ROOT/bin:$PATH"' >> ~/.profile
$ echo 'eval "$(pyenv init -)"' >> ~/.profile
Then, load the new shell environment:
$ source ~/.bashrc
Now you can install Python 3.10.13 using pyenv and set it as the global Python version:
$ pyenv install 3.10.13
$ pyenv global 3.10.13
Verify Python and pip are installed correctly:
$ python --version
$ pip -V

Verify Python and pip versions
I recommend using
pipenvto setup a virtual environment for this project. But we will skip it for now as it is not required.
Setup nanoGPT
Now you are ready to setup nanoGPT project. You can follow the README to get started.
First, clone the repo:
$ git clone git@github.com:karpathy/nanoGPT.git
$ cd nanoGPT
Then, install the required Python packages:
$ pip install torch numpy transformers datasets tiktoken wandb tqdm
nanoGPT comes with integration with Weights & Biases. You can create a free account to get a free API key. Then you can login to wandb using the API key by following the guide:
$ wandb login
This will prompt you to enter the API key. You can find the API key in your account settings.
Training
Finally, you are ready to train the model.
First, download the training data following the
README. This will download
OpenWebText
from Hugging Face to
"~/.cache/huggingface/datasets"
folder, and then create train split and test split (train.bin
and
val.bin
files) in the
data/openwebtext
folder.
Since it takes a while to download the data, you can use
nohup
command to download the data in the background. So that it runs
even if you close the SSH session:
$ nohup python data/openwebtext/prepare.py &
You can monitor the progress of the download by checking the
nohup.out
file:
$ tail -f nohup.out
After the data is downloaded, you can technically start training
the model using the default
config/train_gpt2.py
config file:
$ nohup python train.py config/train_gpt2.py &
However, this assumes you have 8 GPUs. Since we only have 1 GPU,
we need to modify the config file to use only 1 GPU. You can copy
the
config/train_gpt2.py
to
config/train_gpt2_azure.py
and modify the
config/train_gpt2_azure.py
file to use only 1 GPU:
# config for training GPT-2 (124M) down to very nice loss of ~2.85 on 1 node of 8X A100 40GB
# launch as the following (e.g. in a screen session) and wait ~5 days:
# $ torchrun --standalone --nproc_per_node=8 train.py config/train_gpt2.py

wandb_log = True
wandb_project = 'owt'
wandb_run_name='gpt2-124M-azure'

# these make the total batch size be ~0.5M
# 12 batch size * 1024 block size * 5 gradaccum * 1 GPUs = 61440
batch_size = 12
block_size = 1024
gradient_accumulation_steps = 5

# this makes total number of tokens be 300B
max_iters = 600000
lr_decay_iters = 600000

# eval stuff
eval_interval = 1000
eval_iters = 200
log_interval = 10

# weight decay
weight_decay = 1e-1
Specially, this modifies
gradient_accumulation_steps
from the default
5 * 8 to
gradient_accumulation_steps = 5.
I have not delved into the details of how gradient accumulation works, and its relationship to batch size, block size and number of GPUs. Expect a follow up post on this topic as I learn more about it.
Then, you can start training the model using the modified config file:
$ nohup python train.py config/train_gpt2_azure.py &
You should see the training progress in the
nohup.out
file (after a few hours):
step 0: train loss 10.9887, val loss 10.9899
iter 0: loss 10.9934, time 120426.14ms, mfu -100.00%
iter 10: loss 10.3945, time 3202.83ms, mfu 5.26%
iter 20: loss 9.7839, time 3224.55ms, mfu 5.25%
iter 30: loss 9.5148, time 3279.09ms, mfu 5.24%
iter 40: loss 9.2243, time 3337.53ms, mfu 5.22%
iter 50: loss 9.0065, time 3386.33ms, mfu 5.20%
iter 60: loss 8.8772, time 3401.74ms, mfu 5.17%
iter 70: loss 8.5903, time 3408.43ms, mfu 5.15%
iter 80: loss 8.4631, time 3416.65ms, mfu 5.13%
iter 90: loss 8.2467, time 3411.26ms, mfu 5.11%
iter 100: loss 8.1013, time 3404.74ms, mfu 5.09%
You should also be able to see the progress chart in the Weights & Biases dashboard:
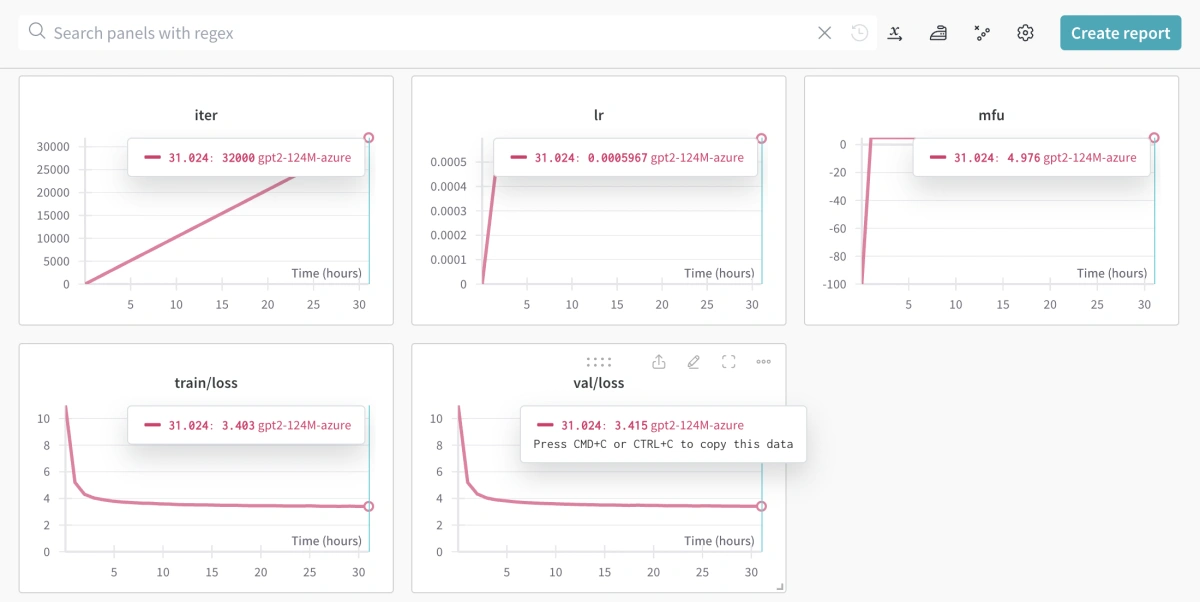
Weights & Biases chart for training nanoGPT on Azure
Results
I have completed the training process and here are the results:
- Model: GPT-2 model (124M parameters) trained on OpenWebText
- Time Taken: 7d 23h 51m 20s in total on Azure with one NVIDIA T4 GPU
- Number of iterations: 200,000 instead of default 600,000
- Cost: Around $200 USD of Azure credits
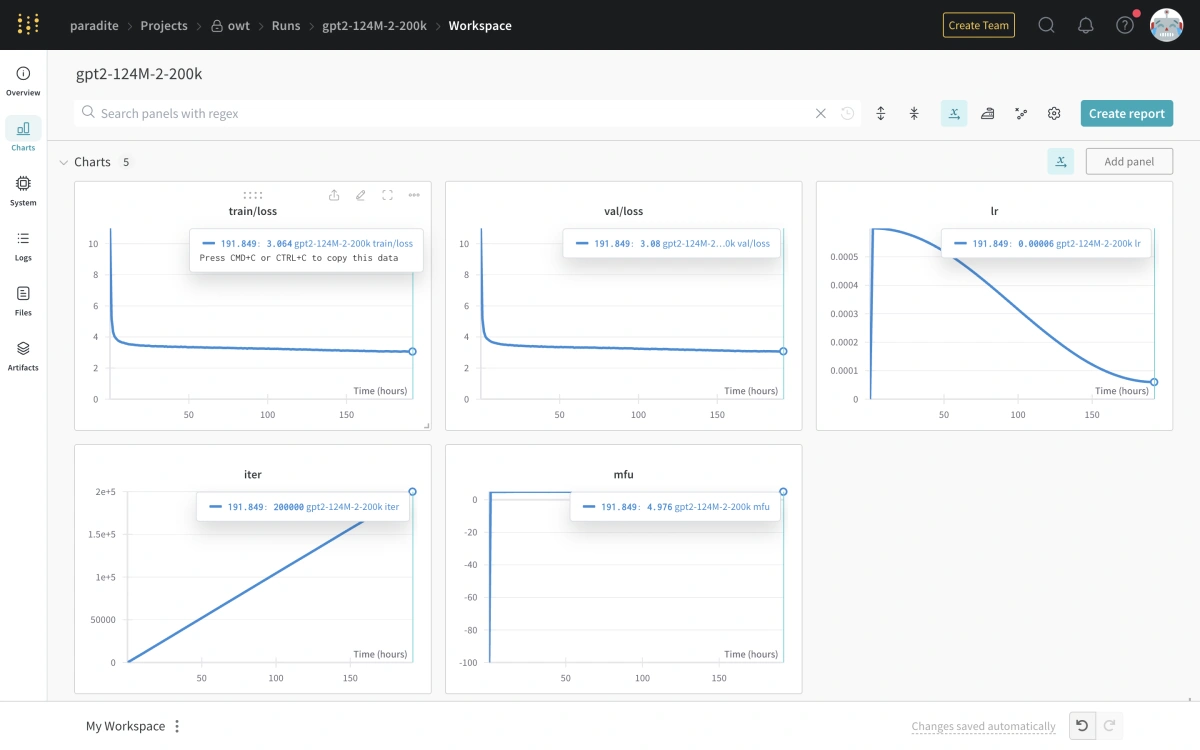
Final Weights & Biases chart after training nanoGPT on Azure
Conclusion
That’s it! Give it some time and you should be able to get some checkpoints to play with.
Let me know if you encounter any issues or have any questions. You can reach me on LinkedIn.